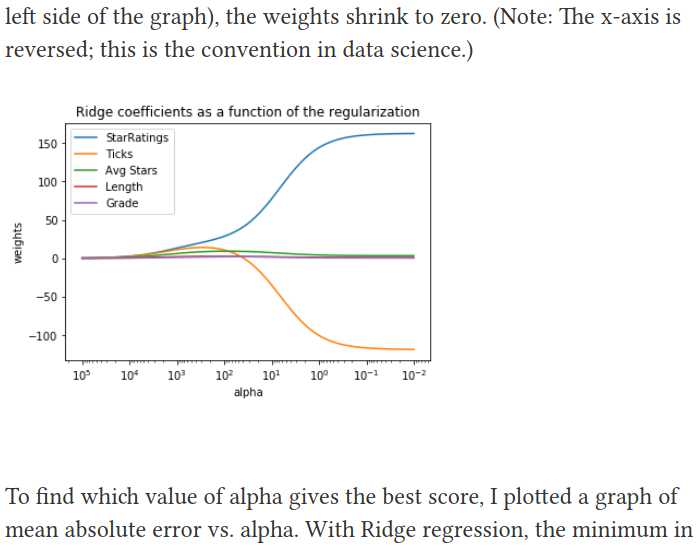
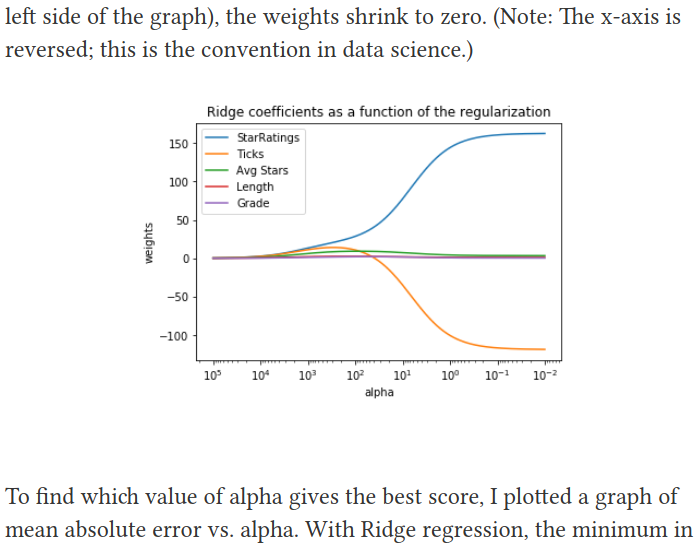
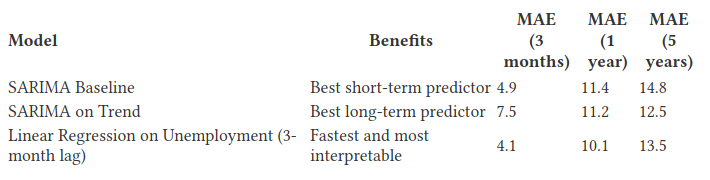
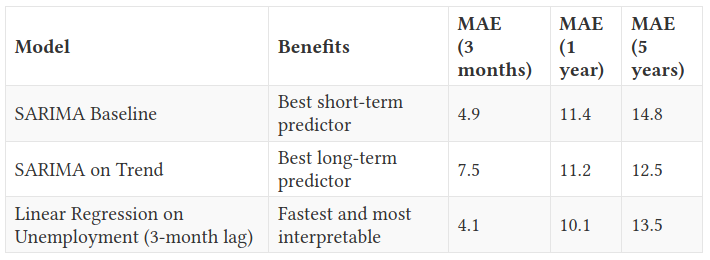
I gave my blog a new makeover.
My previous theme was a slightly modified version of Poole, which I was using it as-is, because shortly after graduating from the Metis bootcamp, my priority was to showcase my project portfolio to help me land my first job. At the company that hired me, one of my interviewers asked me questions about two projects after reading my blog, and this helped move me along in that interview process. The layout was sufficient, and the content was more important.
Things have changed.
The content is still important, but I now feel that a completely minimalistic layout is insufficient for full creative self-expression. I want to post more images and have finer control over how the content is displayed. I want visitors to feel satisfied in visiting my blog and reading the articles I write, instead of feeling like this is just another dumping ground for resume-related data projects. Mostly, I wanted to feel like when I visit my own site, I am visiting my own site.
So I went searching for themes.
Mostly, I searched through JekyllThemes.org, because they’re the first website that shows up on Google and they had hundreds of free themes with links to the Github repository and demo sites. I only had three requirements:
- It had to look modern
- It had to be compatible with Github pages
- I must be able to build it locally
Finding a Template
Since swapping out the template is a major change with the potential for many things to break or function unexpectedly, I definitely wanted to avoid testing in production as much as possible. Therefore, Jekyll was the way to go. Installation was pretty straightforward: I only had to install Ruby and Bundler and be on my merry way. In a short amount of time, I was able to create a blank blog site using jekyll new blog and also run some template blog sites I had git-cloned by using bundle exec jekyll serve to serve them on http://127.0.0.1:4000/.
Initially, I was worried that if package management for Ruby is anything like Python, switching from template to template might be a lot of overhead. However, I was pleasantly surprised to find that when a site didn’t work, all I had to do is run bundle install or bundler update --bundler and I would automagically have the right dependencies.
After looking at about 8 themes (honorable mentions include Lagrange, Centrarium, and sleek), I settled on mediator (demo site here), short for Medium emulator. At this point, perhaps you might be thinking: if you wanted your blog to look like Medium, why didn’t you just make a Medium account and post your content on Medium? Here are four reasons I would rather have my own blog:
- I’ve always believed in open-access to content, especially if I’m creating it for my own leisure. I do believe that professionals like authors and journalists and scientific writers should be paid for professional-level work, but I don’t consider blogging about personal data projects to be in the same category.
- Since my blog doubles as my portfolio, Medium’s paywall may be problematic to recruiters trying to access my content, which may result in some of them giving up before seeing the post.
- I want to retain full control over my content. That includes the right to alter it for any or no reason and/or delete it for any or no reason. That also includes the ability to customize the features of the website.
- One of my goals is to learn about front-end development, and this is a good place to start.
After choosing the theme, I went to work to customize it.
Adding Custom Features
One other template that I was really impressed with is Lagrange (demo site here). Although more minimalistic than I wanted, I really liked that each post in the feed had a thumbnail image and time-estimate associated with it, and I wanted to add these to my blog.
To add thumbnail images, following the example given by Lagrange, I added the following css .class to the main.sass:
.post-thumbnail
  display: inline-block
  width: 100%
  height: 300px
  margin-bottom: 25px
  float: center
  background-size: cover
Then, in index.html, I added the image just above the post preview text.
<a class="post-thumbnail" href="" style="background-image: url('')"></a>
To add the time-estimate, I copied read-time.html from Lagrange, then added the time-estimate output by read-time.html just below the preview text.
<i class="fa fa-calendar" aria-hidden="true"></i> {\{ post.date | date_to_string \}}
- <i class="fa fa-clock-o" aria-hidden="true"></i> {\% include read-time.html \%} </span>
Perfecting the Formatting
The main purpose of the blog template is to render blog posts written in Markdown as HTML to be served by the web browser. Spot checking each of my blog posts, I identified three things that needed adjustment.
-
Pictures were not centered
To tackle this, I found that in index.js, there is code that, for each image, generates a caption based on its alt tag. Here is the original code in index.js:
// Creates Captions from Alt tags
$(".post-content img").each(function() {
    // Let's put a caption if there is one
    if($(this).attr("alt") && !$(this).hasClass("emoji"))
        $(this).wrap('<figure class="image"></figure>')
            .after('<figcaption>'+$(this).attr("alt")+'</figcaption>');
});
This seemed like the right place to add image-centering, so I modified it to include
style="text-align: center", also adding it to images that did not have alt tags.// Creates Captions from Alt tags $(".post-content img").each(function() { // Let's put a caption if there is one if($(this).attr("alt") && !$(this).hasClass("emoji")){ $(this).wrap('<figure class="image" style="text-align: center"></figure>') .after('<figcaption>' + $(this).attr("alt") + '</figcaption>'); // Still center the image if alt tags are not included } else {$(this).wrap('<figure class="image" style="text-align: center"></figure>'); } });Before:
After:
-
Tables were missing borders and spacing
To add borders, I discovered that the
tableclass didn’t exist in main.sass. I checked how Poole renders its tables and added the missing classes to main.sass under the.post-contentclass.table margin-bottom: 1rem width: 100% border: 1px solid #e5e5e5 border-collapse: collapse td, th font-size: 18px padding: .25rem .5rem border: 1px solid #e5e5e5 th text-align: left tbody tr:nth-child(odd) td, tbody tr:nth-child(odd) th background-color: #f9f9f9To add spacing before and after the table, I added the following javascript to index.js:
// Add Space Before and After Tables
$(".post-content table").each(function() {
    $(this).before('<br>').after('<br>');
});
Before:
After:
-
Code blocks were not centered and the code had ugly highlighting
I feel like I might be nitpicking here, but it really bothered me that the code wasn’t centered. To adjust this, I found that code was also being handled by the main.sass file. The default settings are below:
pre,
code
  font-size: 15px
  border: 1px solid #e8e8e8
  border-radius: 3px
  background-color: #eef

code
  padding: 1px 5px

pre
  padding: 8px 12px
  overflow-x: scroll
  > code
    border: 0
    padding-right: 0
    padding-left: 0
Getting rid of the background color and experimenting with the padding did the trick:
pre,
code
  font-size: 15px
  border: 1px solid #e8e8e8
  border-radius: 3px

code
  padding: 1px 1px

pre
  padding-top: 20px
  padding-left: 16px
  padding-bottom: 12px
  overflow-x: scroll
  > code
    border: 0
    padding-right: 0
    padding-left: 0
Before:

After:

Outro
Although my main craft is data science, knowing a little bit of front-end gives me finer control over how I am able to present my work. Having a site that I customized myself makes it feel more personal to me, and I also hope it makes your experience on the site more enjoyable too.