At home, I use Linux 95% of the time. It worked well for me during the Data Science bootcamp, and it continues to work well for me my day-to-day life. Of course, Ubuntu requires a LOT (and I really do mean a lot!) of massaging to get it to function properly, which, over time has given me an deep appreciation for how much Windows and Apple abstract that away. For example, here are just some of the things I had to deal with:
- Nvidia driver wasn’t detected, so I had to reinstall it in a very specific way
- Hibernation wasn’t included by default, so I had to write a shell script to enable this to happen. There were additional bugs I had to deal with after the initial setup.
- Nautilus (file manager) did not open folders on desktop - this ended up being due to conflicts between Gnome and MATE
- The touchpad was oversensitive, so I had to write a shell-script to adjust synaptics options upon startup
- Speaker volume was low even when I had the system settings turned all the way up. After exploring the options, I ended up settling on alsamixer (as opposed to other solutions)
- The screen color temperature cannot be adjusted using the settings panel or Gnome-tweaks, so I ended up aliasing a bash function to execute the proposed solution
- HBO Max stopped working and still doesn’t work, and there’s no solution for this
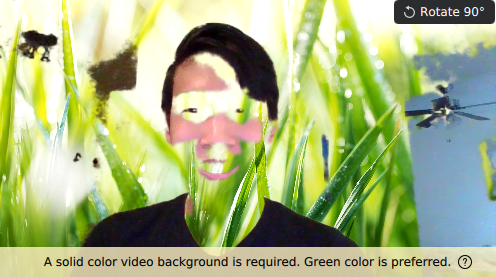
The latest issue I had to deal with is that in the Linux version of Zoom, the virtual background only works if you have a green screen. Here’s what Zoom looks like with the default software:
This problem has become more urgent, because recently, I had some Zoom interviews and also attended a Bioinformatics meetup. Upon Googling for solutions, I came across this post by Ben Alder describing how he used Tensorflow’s bodypix module to perform image segmentation on a webcam feed, then output the result to a virtual camera. Since I have some interest in computer vision, this software solution to my problem was very interesting to me. I additionally found this out-of-the-box solution, which I then forked and installed.
Ben Alder describes well how the program works, so rather than repeat the explanation, I want to highlight some of the issues I ran into trying to get it to work on my machine. Rather than using a Docker container, I wanted the program to be able to run directly on my machine, and I followed the two README files available in the Github repository:
Pre-Installation
This part was relatively straightforward. I installed golang and bazel via bazelisk by executing the following:
# Install golang
sudo apt-get install golang  # install golang
# add export GOPATH=$HOME/go to ~/.bashrc
go get github.com/bazelbuild/bazelisk

# Install bazelisk
# Add Bazel distribution URI as a package source
curl -fsSL https://bazel.build/bazel-release.pub.gpg | gpg --dearmor > bazel.gpg
sudo mv bazel.gpg /etc/apt/trusted.gpg.d/
echo "deb [arch=amd64] https://storage.googleapis.com/bazel-apt stable jdk1.8" | sudo tee /etc/apt/sources.list.d/bazel.list
# add export USE_BAZEL_VERSION=0.26.1 to ~/.bashc
sudo apt update && sudo apt install bazel  # install bazel
npm install -g @bazel/bazelisk  # install bazelisk
Compiling Tensorflow
The majority of the work happened here. Since I was installing Tensorflow directly on my base machine, I wanted to build it with XLA JIT, CUDA, and TensorRT support so if I were to use it for other applications down the road, I will not have to rebuild it. Being able to build Tensorflow successfully would also verify that CUDA is correctly installed on my computer (hint: it wasn’t!). The first thing I did was to clone Tensorflow and then attempt to configure it:
# Install Tensorflow
git clone https://github.com/tensorflow/tensorflow.git
cd tensorflow
git checkout v1.15.0
./configure  # issue here
I then ran into this issue, and the configuration questions would just repeat themselves.
Please specify the CUDA SDK version you want to use. [Leave empty to default to CUDA 10]:


Please specify the cuDNN version you want to use. [Leave empty to default to cuDNN 7]:


Please specify the TensorRT version you want to use. [Leave empty to  default to TensorRT 5]:


Please specify the locally installed NCCL version you want to use. [Leave empty to use http://github.com/nvidia/nccl]:


Please specify the comma-separated list of base paths to look for CUDA libraries and headers. [Leave empty to use the default]:


Could not find any cuda.h matching version '10' in any subdirectory:
        ''
        'include'
        'include/cuda'
        'include/*-linux-gnu'
        'extras/CUPTI/include'
        'include/cuda/CUPTI'
of:
        '/lib'
        '/lib/i386-linux-gnu'
        '/lib/x86_64-linux-gnu'
        '/lib32'
        '/usr'
        '/usr/lib'
        '/usr/lib/i386-linux-gnu'
        '/usr/lib/i386-linux-gnu/sse2'
        '/usr/lib/x86_64-linux-gnu'
        '/usr/lib/x86_64-linux-gnu/libfakeroot'
        '/usr/lib32'
        '/usr/local/cuda-10.0/targets/x86_64-linux/lib'
        '/usr/local/cuda-10.1/targets/x86_64-linux/lib'
        '/usr/local/cuda-10.2/targets/x86_64-linux/lib'
Asking for detailed CUDA configuration...
After a lot of searching, I found that the main issue is that there are many different versions of cuDNN, TensorRT, CUDA, and libninfer5, and all of them need to be compatible with each other and my operating system. After a few false starts, I settled on the following:
| Package | Version |
|---|---|
| Cuda | 10.0 |
| cuDNN 7.6.5 | 7.6.5 |
| TensorRT | 5.1.5.0 |
Here are the full steps, if you’re interested:
# install cuda 10.0
# download the deb(network) package from here: https://developer.nvidia.com/cuda-10.0-download-archive
sudo dpkg -i cuda-repo-ubuntu1804_10.0.130-1_amd64.deb
sudo apt-key adv --fetch-keys https://developer.download.nvidia.com/compute/cuda/repos/ubuntu1804/x86_64/7fa2af80.pub
sudo apt-get update
sudo apt-get remove cuda  # uninstall cuda 11.1
sudo apt-get install cuda-10.0
sudo apt-get autoremove  # remove cuda-10.2

# install cudnn
# download cudnn from here: https://developer.nvidia.com/rdp/cudnn-archive
# version downloaded: cuDNN v7.6.5 (November 5th, 2019), for CUDA 10.0
# unzip and move the cuda folder into home
sudo cp cuda/include/cudnn*.h /usr/local/cuda-10.0/include
sudo cp cuda/lib64/libcudnn* /usr/local/cuda-10.0/lib64
sudo chmod a+r /usr/local/cuda-10.0/include/cudnn*.h /usr/local/cuda-10.0/lib64/libcudnn*

# symlink cuda-10.0 to cuda
sudo rm /usr/local/cuda
sudo ln -s /usr/local/cuda-10.0 /usr/local/cuda

# download tensorrt
# note: debian installation from https://developer.nvidia.com/nvidia-tensorrt-5x-download did NOT work
os="ubuntu1804"
tag="cuda10.1-trt5.1.5.0-ga-20190427"
sudo dpkg -i nv-tensorrt-repo-${os}-${tag}_1-1_amd64.deb
sudo apt-key add /var/nv-tensorrt-repo-${tag}/7fa2af80.pub
sudo apt-get install --no-install-recommends libnvinfer5 libnvinfer-dev  # this fixed the issue, see: https://forums.developer.nvidia.com/t/unmet-dependencies-tensorrt-depends-libnvinfer5/66022
sudo apt-get install tensorrt  # worked after installing libninfer5
After this, I was finally able to reach the end of the configuration:
Preconfigured Bazel build configs. You can use any of the below by adding "--config=<>" to your build command. See .bazelrc for more details.
	--config=mkl         	# Build with MKL support.
	--config=monolithic  	# Config for mostly static monolithic build.
	--config=gdr         	# Build with GDR support.
	--config=verbs       	# Build with libverbs support.
	--config=ngraph      	# Build with Intel nGraph support.
	--config=numa        	# Build with NUMA support.
	--config=dynamic_kernels	# (Experimental) Build kernels into separate shared objects.
	--config=v2          	# Build TensorFlow 2.x instead of 1.x.
Preconfigured Bazel build configs to DISABLE default on features:
	--config=noaws       	# Disable AWS S3 filesystem support.
	--config=nogcp       	# Disable GCP support.
	--config=nohdfs      	# Disable HDFS support.
	--config=noignite    	# Disable Apache Ignite support.
	--config=nokafka     	# Disable Apache Kafka support.
	--config=nonccl      	# Disable NVIDIA NCCL support.
Configuration finished
Hooray! Now to build it:
bazel build --config opt //tensorflow/tools/lib_package:libtensorflow
… and this took a solid hour!
Installing V4LoopBack
Like the pre-installation, this part was also pretty straightfoward. However, I had to install some additional libraries not listed in the original post:
# install dkms
sudo apt-get install linux-generic
sudo apt install dkms

# install v4l2loopback from the repository
cd cam
git clone https://github.com/umlaeute/v4l2loopback.git
cd cam/v4l2loopback
make  # The other commands are not needed

# use dkms to install v4l2loopback
sudo cp -R . /usr/src/v4l2loopback-1.1
sudo dkms add -m v4l2loopback -v 1.1
sudo dkms build -m v4l2loopback -v 1.1
sudo dkms install -m v4l2loopback -v 1.1

# extra: install v4l-utils
sudo apt install v4l-utils
# list devices: v4l2-ctl --list-devices

# extra: install libav
sudo apt-get install libavcodec-dev libavformat-dev libavdevice-dev
To load v4l2loopback at boot, I did the following:
sudo nano /etc/modprobe.d/v4l2loopback.conf
# add the following: options v4l2loopback devices=1  exclusive_caps=1 video_nr=2 card_label="v4l2loopback"
sudo nano /etc/modules-load.d/v4l2loopback.conf
# add the following: v4l2loopback

# Note: Without the above, you would have to run the following in order to use fakecam.py:
sudo modprobe v4l2loopback devices=1
Finally, I rebooted my device to complete the installation.
Testing Linux-Fake-Background-Webcam
With Tensorflow and v4l2loopback installed, I forked and cloned Linux-fake-Background-Webcam and proceeded to try and use it. This program has two parts:
- bodypix: a node.js app that inputs the image fed to it and outputs a binary mask to localhost:9000
- fakecam: a python script that reads the output of localhost:9000 and uses pyfakewebcam to create a fake webcam device
Of course, like most installations on Linux, this failed the first time.
Running Bodypix
I’ve had to reinstall node multiple times, but this time I think I finally got it right. The problem is that on Ubuntu, node and nodejs are not the same. In order to force them to be the same (like they are on Apple machines), I had to do the following:
# Reinstall node
sudo npm cache clear --force && sudo npm install -g npm
sudo npm install -g n
sudo n stable

# find out which node is being used
which node
/home/harrisonized/.nvm/versions/node/v14.12.0/bin/node

# create a symbolic link from node to nodejs
# see https://askubuntu.com/questions/695155/node-nodejs-have-different-version
sudo rm -rf /usr/bin/nodejs
sudo ln -s $(which node) /usr/bin/nodejs
Next, I ran into this issue in which Tensorflow couldn’t be found. The listed solution was to rebuild tensorflow.js and use yarn to install it.
npm rebuild @tensorflow/tfjs-node --build-from-source
yarn add @tensorflow/tfjs-node
Finally, bodypix worked!
cd cam/Linux-Fake-Background-Webcam/bodypix/
node app.js
Here’s the expected output:
Found a GPU at /dev/nvidia0
2020-11-20 16:12:46.337653: I tensorflow/core/platform/cpu_feature_guard.cc:142] Your CPU supports instructions that this TensorFlow binary was not compiled to use: AVX2 FMA
2020-11-20 16:12:46.369101: I tensorflow/core/platform/profile_utils/cpu_utils.cc:94] CPU Frequency: 2599990000 Hz
2020-11-20 16:12:46.369554: I tensorflow/compiler/xla/service/service.cc:168] XLA service 0x64f39f0 initialized for platform Host (this does not guarantee that XLA will be used). Devices:
2020-11-20 16:12:46.369570: I tensorflow/compiler/xla/service/service.cc:176]   StreamExecutor device (0): Host, Default Version
2020-11-20 16:12:46.370186: I tensorflow/stream_executor/platform/default/dso_loader.cc:44] Successfully opened dynamic library libcuda.so.1
2020-11-20 16:12:46.391530: I tensorflow/stream_executor/cuda/cuda_gpu_executor.cc:983] successful NUMA node read from SysFS had negative value (-1), but there must be at least one NUMA node, so returning NUMA node zero
2020-11-20 16:12:46.392063: I tensorflow/core/common_runtime/gpu/gpu_device.cc:1618] Found device 0 with properties:
name: GeForce RTX 2070 major: 7 minor: 5 memoryClockRate(GHz): 1.44
pciBusID: 0000:01:00.0
2020-11-20 16:12:46.392238: I tensorflow/stream_executor/platform/default/dso_loader.cc:44] Successfully opened dynamic library libcudart.so.10.0
2020-11-20 16:12:46.393291: I tensorflow/stream_executor/platform/default/dso_loader.cc:44] Successfully opened dynamic library libcublas.so.10.0
2020-11-20 16:12:46.394211: I tensorflow/stream_executor/platform/default/dso_loader.cc:44] Successfully opened dynamic library libcufft.so.10.0
2020-11-20 16:12:46.394428: I tensorflow/stream_executor/platform/default/dso_loader.cc:44] Successfully opened dynamic library libcurand.so.10.0
2020-11-20 16:12:46.395679: I tensorflow/stream_executor/platform/default/dso_loader.cc:44] Successfully opened dynamic library libcusolver.so.10.0
2020-11-20 16:12:46.396607: I tensorflow/stream_executor/platform/default/dso_loader.cc:44] Successfully opened dynamic library libcusparse.so.10.0
2020-11-20 16:12:46.399526: I tensorflow/stream_executor/platform/default/dso_loader.cc:44] Successfully opened dynamic library libcudnn.so.7
2020-11-20 16:12:46.399597: I tensorflow/stream_executor/cuda/cuda_gpu_executor.cc:983] successful NUMA node read from SysFS had negative value (-1), but there must be at least one NUMA node, so returning NUMA node zero
2020-11-20 16:12:46.400101: I tensorflow/stream_executor/cuda/cuda_gpu_executor.cc:983] successful NUMA node read from SysFS had negative value (-1), but there must be at least one NUMA node, so returning NUMA node zero
2020-11-20 16:12:46.400596: I tensorflow/core/common_runtime/gpu/gpu_device.cc:1746] Adding visible gpu devices: 0
2020-11-20 16:12:46.400611: I tensorflow/stream_executor/platform/default/dso_loader.cc:44] Successfully opened dynamic library libcudart.so.10.0
2020-11-20 16:12:46.485116: I tensorflow/core/common_runtime/gpu/gpu_device.cc:1159] Device interconnect StreamExecutor with strength 1 edge matrix:
2020-11-20 16:12:46.485137: I tensorflow/core/common_runtime/gpu/gpu_device.cc:1165]      0
2020-11-20 16:12:46.485141: I tensorflow/core/common_runtime/gpu/gpu_device.cc:1178] 0:   N
2020-11-20 16:12:46.485223: I tensorflow/stream_executor/cuda/cuda_gpu_executor.cc:983] successful NUMA node read from SysFS had negative value (-1), but there must be at least one NUMA node, so returning NUMA node zero
2020-11-20 16:12:46.485545: I tensorflow/stream_executor/cuda/cuda_gpu_executor.cc:983] successful NUMA node read from SysFS had negative value (-1), but there must be at least one NUMA node, so returning NUMA node zero
2020-11-20 16:12:46.485838: I tensorflow/stream_executor/cuda/cuda_gpu_executor.cc:983] successful NUMA node read from SysFS had negative value (-1), but there must be at least one NUMA node, so returning NUMA node zero
2020-11-20 16:12:46.486113: W tensorflow/core/common_runtime/gpu/gpu_bfc_allocator.cc:39] Overriding allow_growth setting because the TF_FORCE_GPU_ALLOW_GROWTH environment variable is set. Original config value was 0.
2020-11-20 16:12:46.486134: I tensorflow/core/common_runtime/gpu/gpu_device.cc:1304] Created TensorFlow device (/job:localhost/replica:0/task:0/device:GPU:0 with 7267 MB memory) -> physical GPU (device: 0, name: GeForce RTX 2070, pci bus id: 0000:01:00.0, compute capability: 7.5)
Platform node has already been set. Overwriting the platform with [object Object].

2020-11-20 16:13:19.731935: I tensorflow/stream_executor/platform/default/dso_loader.cc:44] Successfully opened dynamic library libcudnn.so.7
2020-11-20 16:13:20.571686: I tensorflow/stream_executor/platform/default/dso_loader.cc:44] Successfully opened dynamic library libcuda.so.1
2020-11-20 16:13:20.571736: W tensorflow/stream_executor/cuda/redzone_allocator.cc:312] Not found: ./bin/ptxas not found
Relying on driver to perform ptx compilation. This message will be only logged once.
2020-11-20 16:13:20.608261: I tensorflow/stream_executor/platform/default/dso_loader.cc:44] Successfully opened dynamic library libcublas.so.10.0
At first, I thought something was wrong with the program when I couldn’t access the virtual cam immediately, but it turns out that bodypix takes 30-45 seconds to open libcudnn, libcuda, and libcublas, and the webcam is NOT available until this happens.
Running Fakecam
Since I use conda for most of my Python work, I decided build a conda environment to deal with the dependencies of the fake.py module.
# Create
conda create --name cam python=3.6
conda activate cam
conda install conda

# cam stuff
conda install -c conda-forge opencv==4.2.0.32  # fix "Inappropriate ioctl for device" issue
conda install requests==2.23.0
conda install -c conda-forge aiohttp==3.6.2

# pyfakewebcam
cd conda/local/develop/cam
git clone https://github.com/jremmons/pyfakewebcam.git
python setup.py develop

# requests-unixsocket
cd conda/local/develop/cam
git clone https://github.com/msabramo/requests-unixsocket.git
python setup.py develop
After this, I could run the fake.py module when executing the following commands:
conda activate cam
cd cam/Linux-Fake-Background-Webcam/fakecam/
python fake.py
Here’s the expected output:
Cannot set camera property 3 to 1280, used value: 640.0
Cannot set camera property 5 to 30, used value: 10.0
Running...
Please CTRL-C to reload the background / foreground images
Please CTRL-\ to exit
FPS: 14.53
Making it Automatic
After a couple uses, I found that I didn’t want to be opening terminals typing in the commands manually in order to run it, so I wrote the following shell scripts to deal with this:
bodypix.sh
#!/bin/bash
. ~/.bashrc
cd ~/cam/Linux-Fake-Background-Webcam/bodypix
node app.js
fakecam.sh
#!/bin/bash
source /home/harrisonized/anaconda3/etc/profile.d/conda.sh
conda activate cam
cd ~/cam/Linux-Fake-Background-Webcam/fakecam
python fake.py --no-foreground
Then, I created some desktop icons to execute these shell scripts:
bodypix
[Desktop Entry]
Name=bodypix
Exec=bash -i -c /home/harrisonized/cam/Linux-Fake-Background-Webcam/scripts/bodypix.sh
Icon=/home/harrisonized/cam/Linux-Fake-Background-Webcam/images/human-body-256x256.png
Type=Application
Terminal=true
StartupNotify=true
Name[en_US]=bodypix
fakecam
[Desktop Entry]
Name=bodypix
Exec=bash -i -c /home/harrisonized/cam/Linux-Fake-Background-Webcam/scripts/fakecam.sh
Icon=/home/harrisonized/cam/Linux-Fake-Background-Webcam/images/webcamoid-256x256.png
Type=Application
Terminal=true
StartupNotify=true
Name[en_US]=fakecam
Lastly, I replaced the background to be an actual green screen, so I can swap the background directly in Zoom’s software.
… And it works!
I used this all throughout the Bioinformatics meetup on Wednesday, November 18, and it for 2 hours straight without crapping out at all. Here’s the final result:

Hooray!